THE ANGLESELECT QUICK START
From your camera
to your first cut.
AngleSelect saves three or four fixed views as a multicam setup. Your original 360° video stays unchanged. Make the cuts and export the finished movie in your editor.
Which computer are you using?
Which editor are you using?
Choose your computer to see its steps.
Final Cut Pro on Mac · AngleSelect 1.5.4. Final Cut is the default editor on Mac. Start with the installation steps and requirements.
Premiere Pro on Mac · AngleSelect 1.5.4. Native Mac Premiere import and render checks have passed. Try a short clip first. See installation and requirements and the test coverage.
Resolve Studio on Mac · AngleSelect 1.5.4. Three or four views share your original 360° video, with continuous source audio. Paid Studio and Insta360 Reframe are required. See the tested workflow and its limits.
Resolve Studio on Windows · AngleSelect 1.5.1. Three or four views share your original 360° video, with continuous source audio. Paid Studio is required; the Windows workflow uses built-in Fusion tools and needs no reframe plugin. See the tested workflow and its limits.
Premiere Pro on Windows · AngleSelect 1.5.1. This is an unsigned x64 installer with a native Windows interface. App-generated 4K portrait projects passed native import, camera-cut, export and save/reopen checks on a physical Windows PC. Start with a short clip and use proxies for demanding footage. See installation and requirements and the measured coverage and audio caveat.
What you need
- An Apple-silicon Mac running macOS 14 or later.
- An x64 Windows PC with .NET Framework 4.8, included with current Windows 11. For Premiere, Windows 11 24H2 or later is required. See test coverage for the physical-PC and virtual-machine checks.
- A stitched, full 360° MP4 or MOV in 2:1 equirectangular format — the wide, flattened panorama, with a width exactly twice its height. Check the supported frame rates, HDR formats, audio and source-size limits.
- Final Cut Pro with FCPXML 1.14 support; import has been tested with Final Cut Pro 12.3. No plugin is needed.
- Premiere Pro 26 or later and free GoPro Reframe 2 or later. Lower-resolution SDR sources in 4K portrait use Insta360 Reframe V2 for Premiere; AngleSelect shows which plugin is needed. Install it separately and restart Premiere. Check Adobe’s Premiere requirements too.
- Paid DaVinci Resolve Studio 21.1.1 and Insta360 Reframe for DaVinci Resolve, installed separately from Insta360’s downloads. The Resolve plugin requires macOS 15 or later. Choose the Resolve plugin, rather than the Premiere plugin. Restart Resolve after installing the plugin. The free Resolve edition is not supported by this workflow.
- Paid DaVinci Resolve Studio 21.1.1. AngleSelect uses Resolve’s built-in Fusion tools on Windows; no reframe plugin is needed. The free Resolve edition and other Resolve versions are not supported by this workflow.
- Individual-video export on Mac and native Windows does not require an editor or plugin.
1. Prepare your recording
Open your camera’s footage in its desktop software and export a 360° video at the original frame rate and your preferred source resolution. Do not export a normal, already-reframed flat video. Raw camera formats, including .insv and GoPro .360, need to be stitched first.
Check that the directions stay consistent throughout the clip. For an airplane-mounted camera, look at a cabin feature while the airplane turns: it should stay in the same part of the panorama. Stabilization and lock settings differ by camera software. In a GoPro Player raw-playback test, horizon leveling with World Lock off kept the views attached to the airplane. Check the stitched export too.
AngleSelect does not correct orientation drift that has already been baked into an export. Play through a short sample before exporting a long flight.
2. Open and frame in AngleSelect
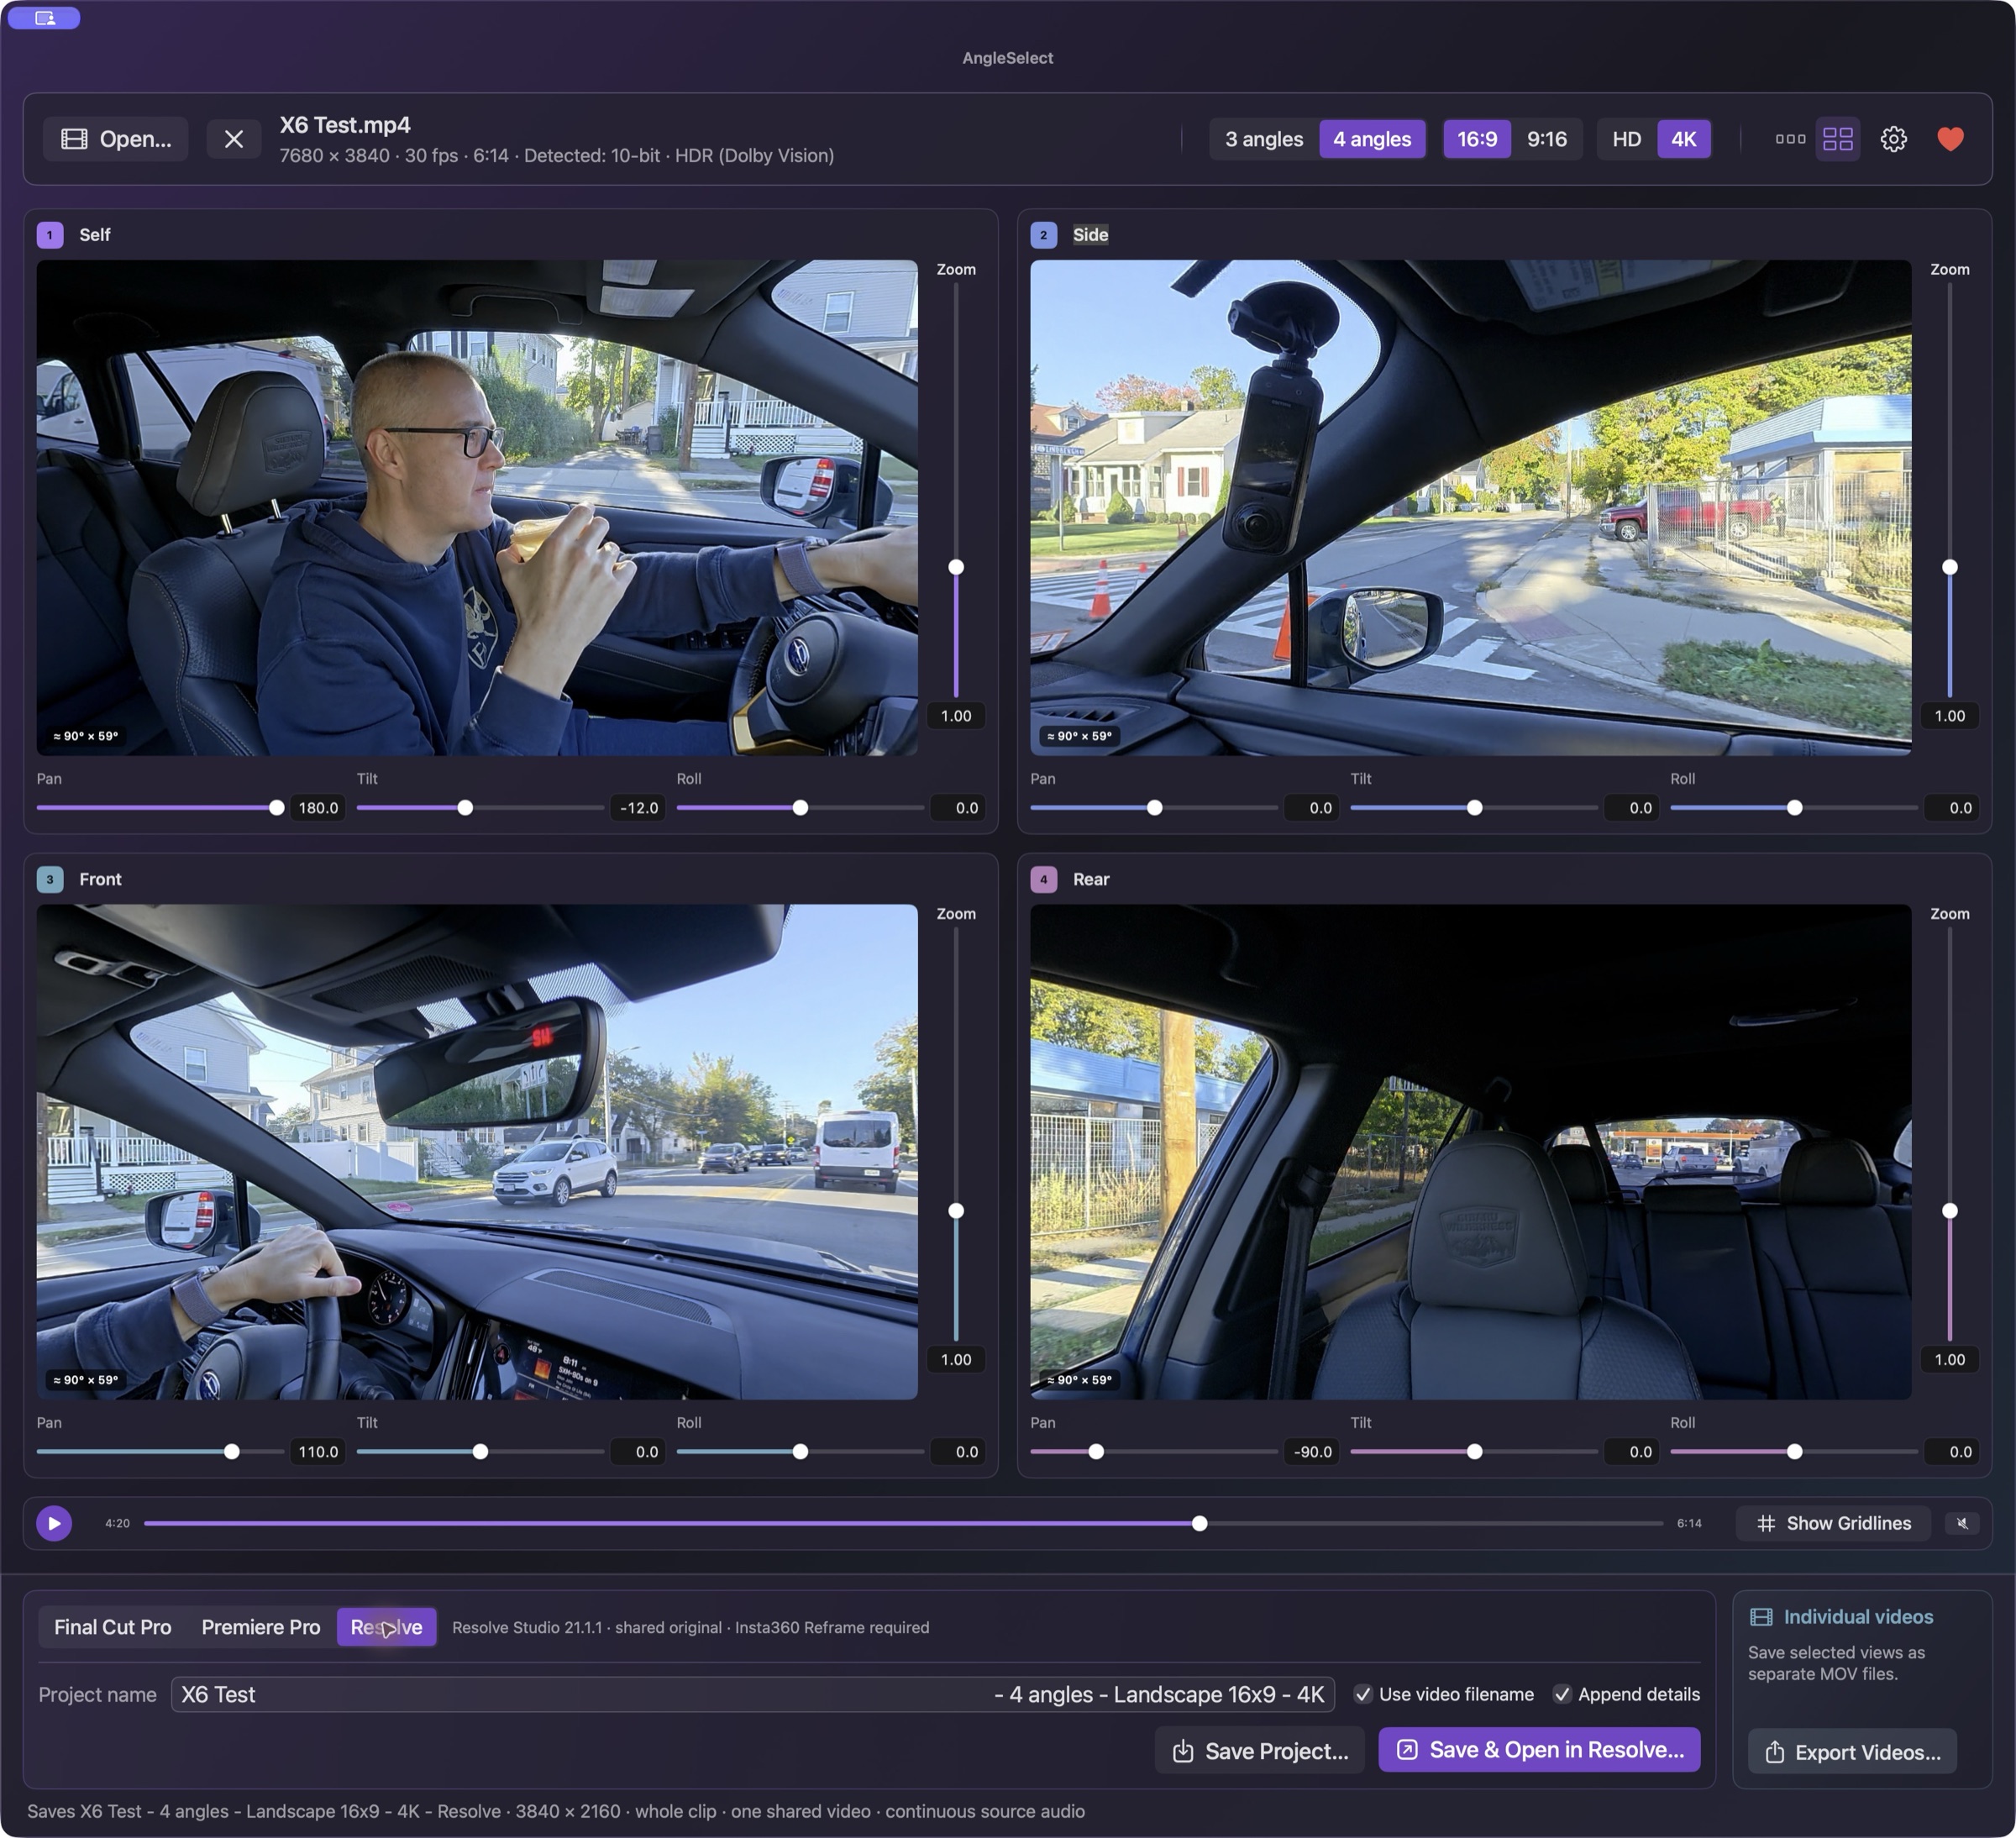
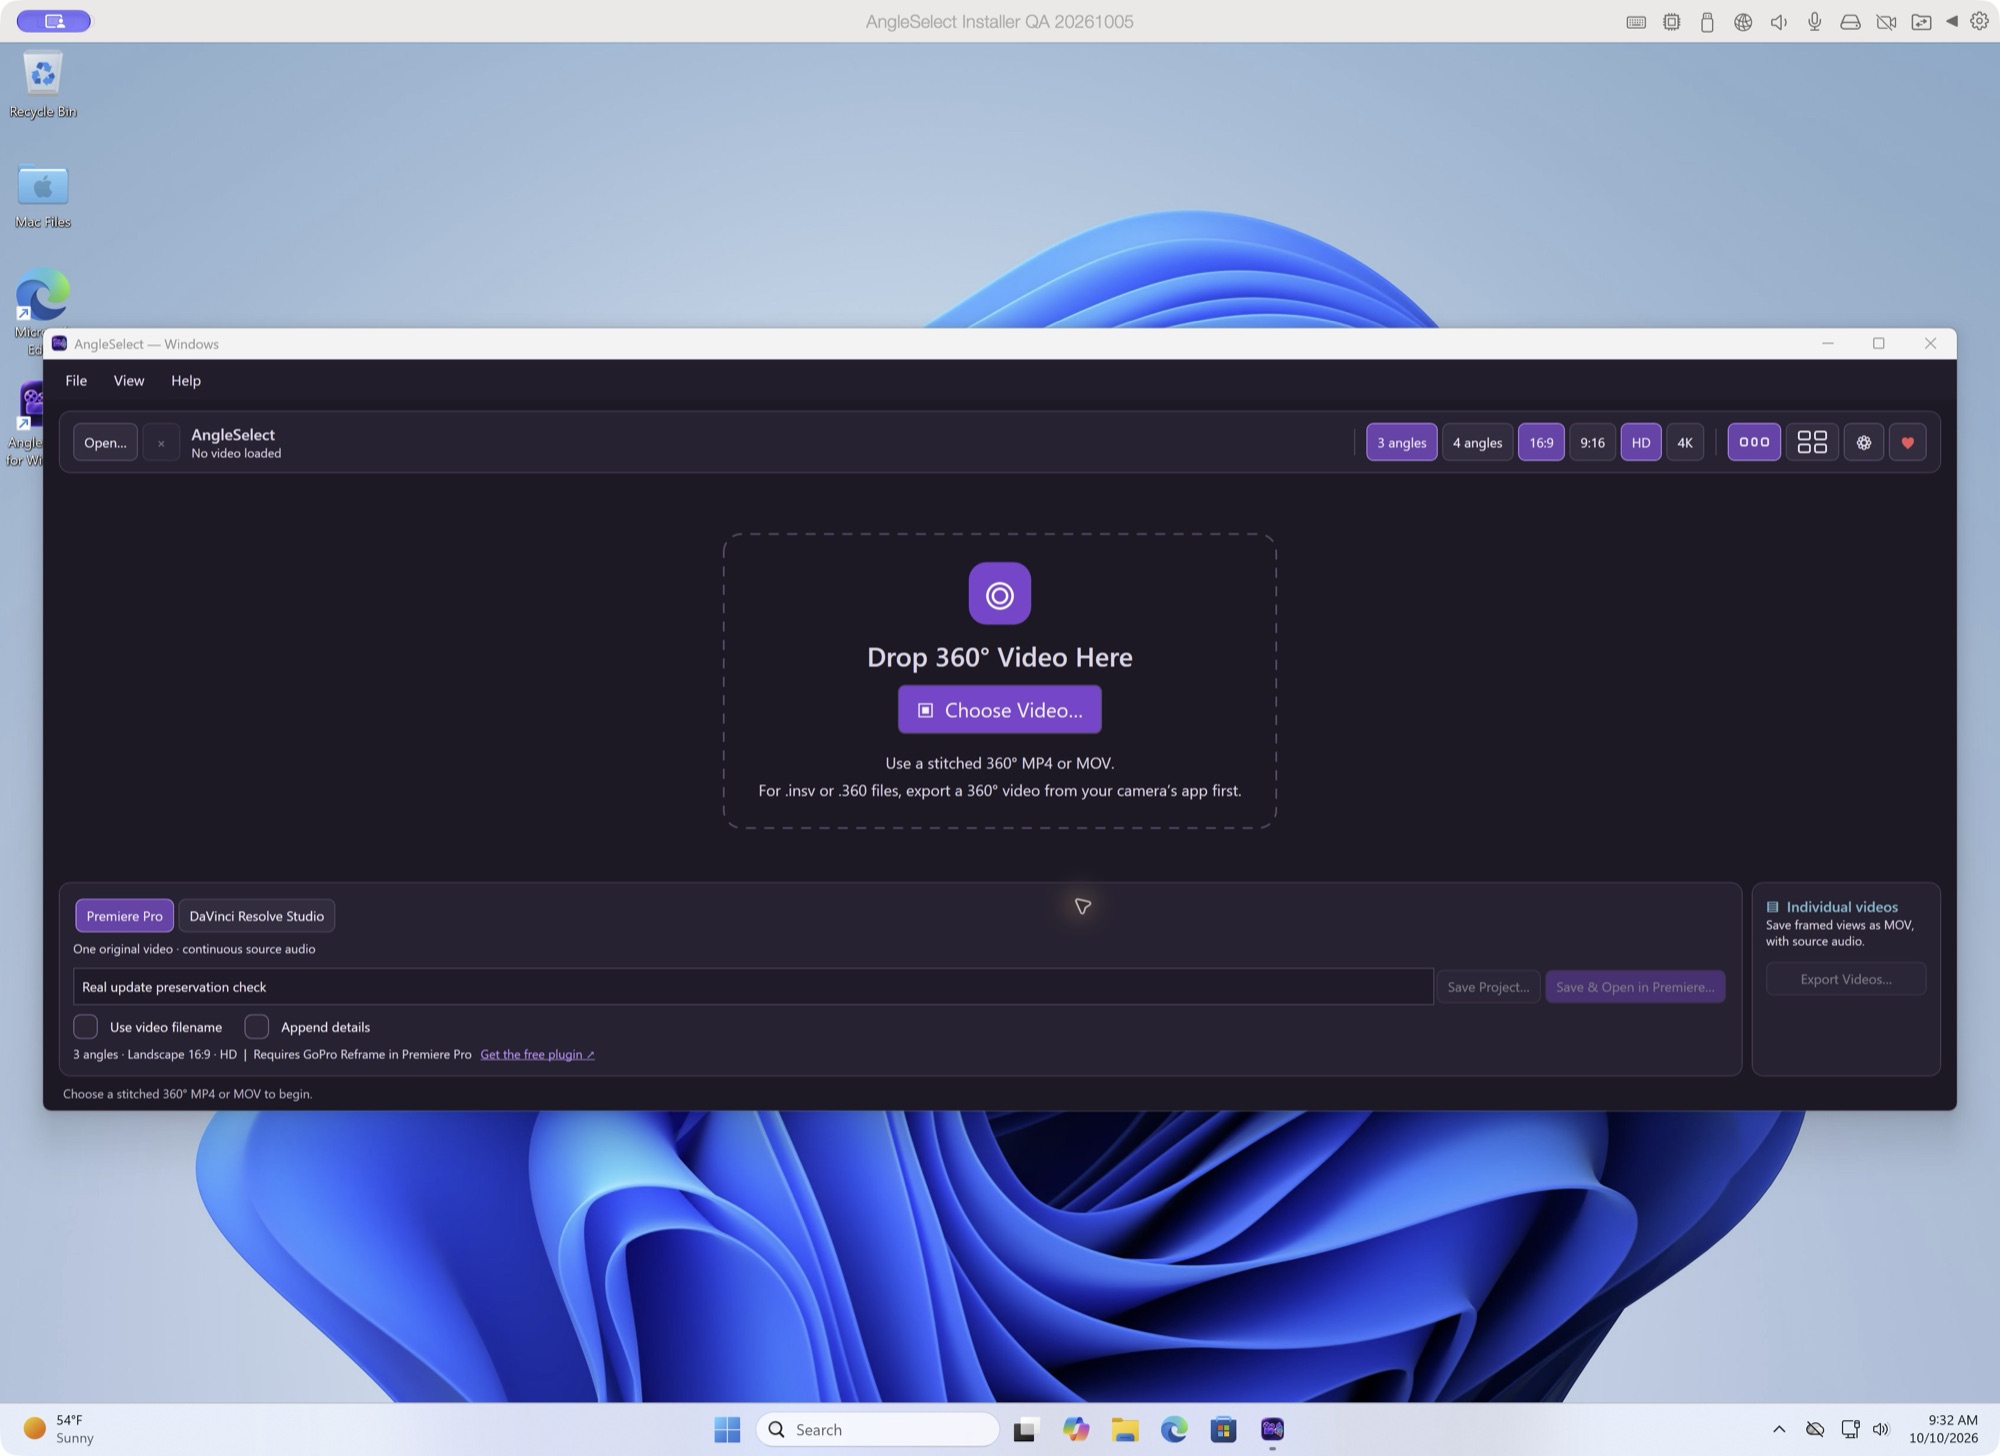
- Click Choose Video… or Open… to open your stitched MP4 or MOV. You can also drop it onto the window or press ⌘O. You can also use File → Open 360° Video… (Ctrl+O).
- On Mac, select Premiere Pro in the export panel. Each editor keeps separate framing, so choose the editor before setting your views.
- Select Resolve in the export panel before framing your views.
- Select Premiere Pro in the export panel before framing your views.
- Choose 3 angles or 4 angles. Four is the default.
- In the toolbar, choose 16:9 for landscape or 9:16 for portrait, then click HD or 4K. The footer shows the project dimensions. Premiere supports HD and 4K in both formats. GoPro Reframe supports all four sizes, including supported HDR. The app shows an Insta360 requirement only for lower-resolution SDR sources in 4K portrait.
- Give each view a distinct name. The field highlights while you edit; press Return or click elsewhere to finish. The initial views are starting points; adjust them to match your camera position.
- Drag a preview to adjust Pan and Tilt. Scroll over it or use the vertical Zoom control beside the video to zoom in or out. Use the sliders or number fields for precise adjustments, including Roll to level the horizon.
- Press Space to play or pause, or use the playback bar to check different moments. After editing a name or number, click a preview to return Space to playback.
Click Show Gridlines beside the playback controls for alignment guides. They appear only in the previews and are not included in exported projects or videos.
A reset arrow appears beside each changed value. It restores that value without changing the others. When two or more values differ from their defaults, Reset All appears beside the view name and restores that view’s framing for the selected format.
Use a reset arrow to restore one value without changing the others. Reset All restores that view’s framing for the selected format.
Use the one-row or two-row icons beside Settings to arrange your previews. Both layouts work with three or four angles, in landscape or portrait. Switching layouts fits the largest previews with a little space around the window. You can still resize it yourself; your row choice stays the same. Closing and reopening restores your last window size and layout. Choose Window → Fit to Views (⌥⌘F) or Window → Reset Window Size to fit the selected layout again.
Landscape and portrait retain separate framing. Zoom shows relative magnification: 1.00 is the original preset, and higher values show a tighter view. The chip on each preview estimates horizontal and vertical coverage. Confirm tight framing and color in your editor. Each editor keeps separate framing, so switching editors does not replace the views you already set. Premiere framing is calibrated for the required plugin’s rectilinear projection and has its own zoom limits.
| Format | HD | 4K |
|---|---|---|
| Landscape 16:9 | 1920 × 1080 | 3840 × 2160 |
| Portrait 9:16 | 1080 × 1920 | 2160 × 3840 |
HD/4K sets the dimensions of the multicam clip and prepared Final Cut project, and the actual video size when using Export Videos. It does not resize the source, change AngleSelect’s preview quality, or create proxies. A 4K project cannot add detail to a view taken from only part of a 360° image.
| Format | HD | 4K |
|---|---|---|
| Landscape 16:9 | 1920 × 1080 | 3840 × 2160 |
| Portrait 9:16 | 1080 × 1920 | 2160 × 3840 |
GoPro 4K portrait needs a stitched source at least 4320 × 2160. Its other presets require the source to be at least as wide and tall as the output. Lower-resolution SDR portrait sources use Insta360 Reframe V2. Project dimensions do not resize the original video or add detail to a view taken from only part of a 360° image. Selecting HD/4K does not create proxy media.
The native Windows app shares one locally decoded 360° frame across the previews. The saved Premiere project references your original recording. Its bundled FFmpeg tools also handle individual MOV exports.
| Format | HD | 4K |
|---|---|---|
| Landscape 16:9 | 1920 × 1080 | 3840 × 2160 |
| Portrait 9:16 | 1080 × 1920 | 2160 × 3840 |
Project dimensions do not resize the original or create proxies. Check tight framing in Resolve; a 4K output cannot add detail to a small part of the 360° image.
Pick up where you left off. Settings → Remember last video and angles is on by default. It remembers the video, all four view names, framing for both formats, output choices, and project-name options on this computer. It also remembers the selected editor and each editor’s framing. Closing or quitting saves your playback position too; reopening starts paused. Turning the setting off clears the saved session.
If the last video cannot be reopened, reconnect its drive and choose OK to keep the remembered setup, or choose Clear Last Opened State to forget that video and its playback position. Your angle names, framing and output choices stay saved. No videos or projects are deleted. Opening a different video replaces the remembered session.
To close the clip, click × beside Open. Playback stops and the empty screen returns. A clip you close will not reopen next launch. Your framing stays available for another clip during this session.
Drag the playback slider to see frames as you scrub; switch off Settings → Playback → Live scrubbing to update only on release. It is also available in the gear menu.
If AngleSelect previews are choppy
The Windows app shares one decoded frame across your views and tries hardware decoding for H.264 and HEVC video, with software fallback when hardware decoding is unavailable. Playback uses a smaller preview image; pausing restores the more detailed view. Performance still depends on the recording, drive, graphics hardware, and driver.
The Mac app shares one decoded frame across your views and uses Metal to draw their framing. Large source files, slow drives, and other work on your Mac can still affect playback.
Try these playback checks first:
- Keep the source fully downloaded on a fast local or attached drive, preferably an SSD.
- Let backups, media generation and video exports finish, or pause them while comparing playback.
- Play a short section and allow a few seconds for playback to settle before judging the result.
Proxy media, render cache and reduced playback resolution are settings in your video editor; they do not change AngleSelect’s own previews. If playback is slow after opening the setup in your editor, use its steps below:
- Final Cut Pro: create ProRes Proxy media and choose Proxy Preferred.
- Premiere Pro: attach and enable proxies, then try Half playback resolution.
- Resolve Studio: use linked proxies and Half timeline playback resolution. If using render cache, let it finish before comparing playback.
To help diagnose choppy previews, play a short section, pause, then choose Help → Save Debug Report…. Review the saved text file and choose it in the optional report field on the contact page. Include what you were doing when the issue appeared. Saving the report does not send it.
3. Save a Final Cut setup on Mac
The Final Cut Pro panel groups your project name and XML save buttons.
- Leave Use video filename checked to use the source name. Uncheck it to type your own project name. Click or hover over the automatic name for a reminder.
- Keep Append details checked to add details such as “4 angles - Landscape 16x9 - 4K.” Uncheck it for your name alone.
- Click Save & Open in Final Cut…. Choose a location and save the XML file. To overwrite an existing XML, choose Replace when macOS asks. Final Cut Pro then opens it for import.
For manual import, use Save XML…, then choose File → Import → XML… in Final Cut Pro. Both buttons save an XML file, not a rendered video. The shortcuts are ⌘S for Save XML and ⇧⌘S for Save & Open in Final Cut.
The XML references your original video. Keep that file and its drive available. If you move or rename it, you will need to relink the media in Final Cut.
4. Cut between your angles in Final Cut
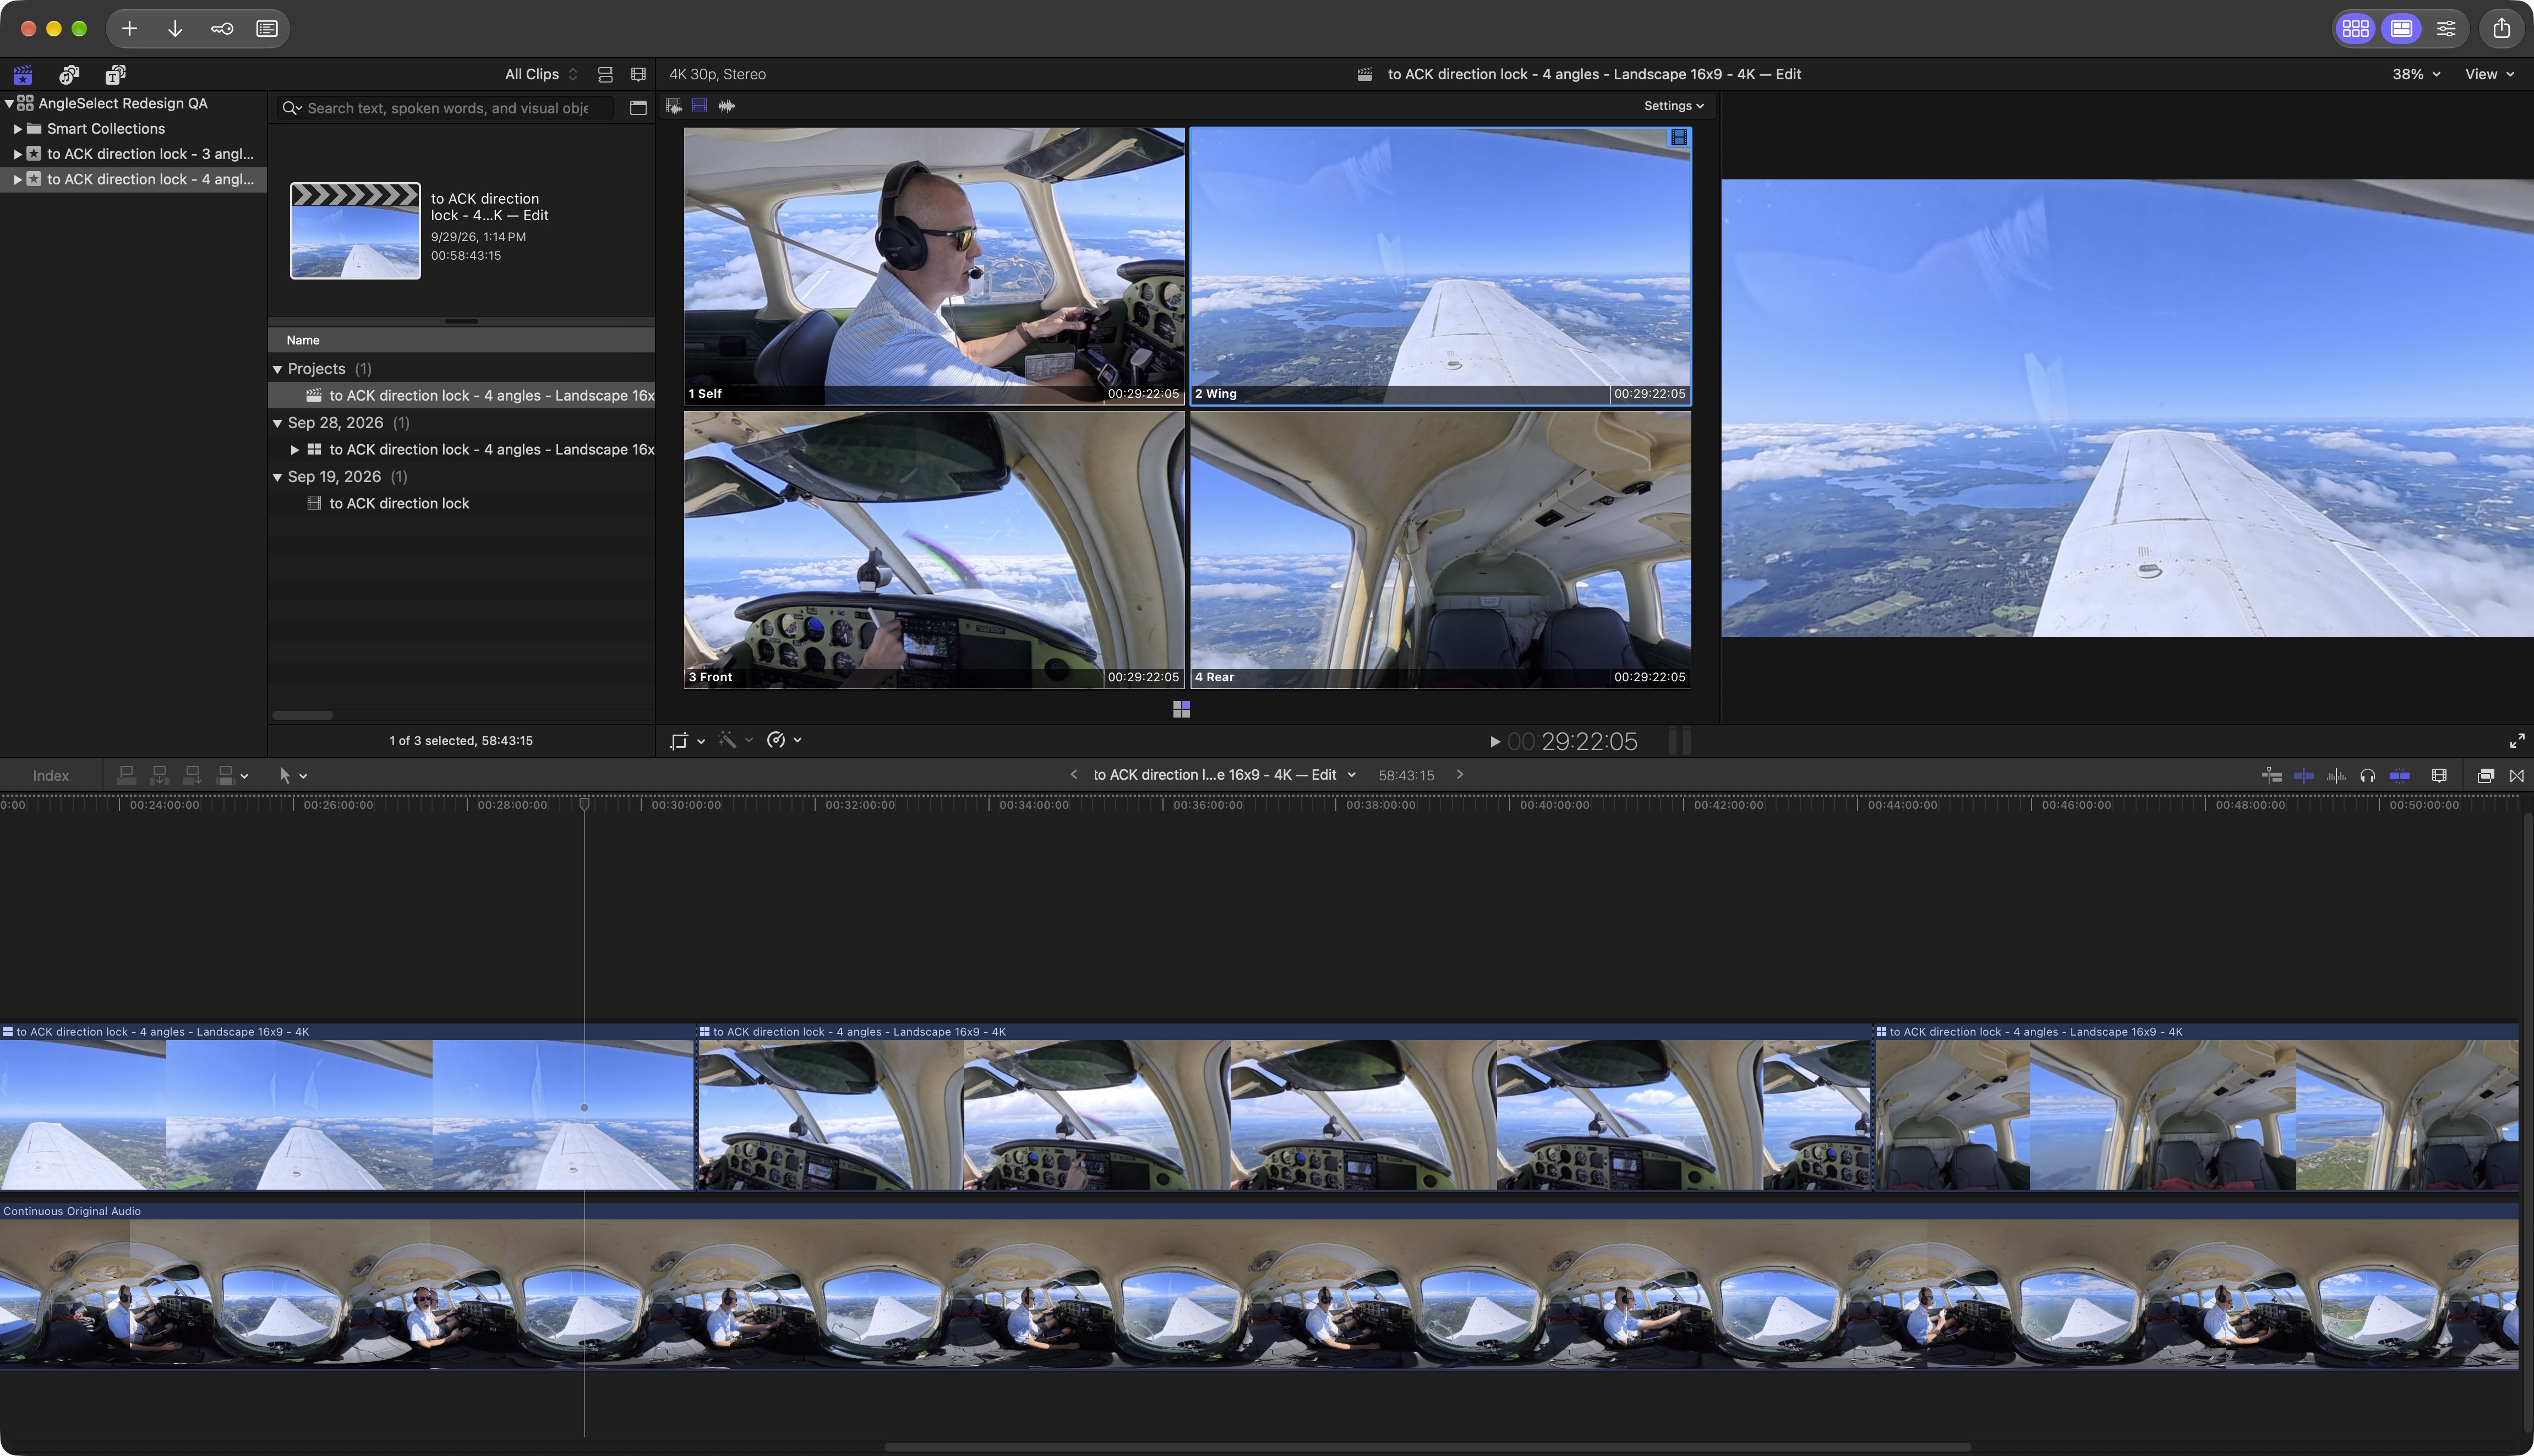
- Complete the XML import in Final Cut Pro and open the prepared project whose name ends in — Edit.
- Show the angle viewer using View → Show in Viewer → Angles (or Shift–Command–7).
- Select video-only switching in the angle viewer. When source audio exists, the imported project already supplies it as a continuous connected audio clip.
- Start playback. Press 1, 2, 3, or 4 to cut to that angle. A three-angle setup uses keys 1–3. If you use a custom Final Cut command set, check its multicam shortcuts.
- Refine the cuts, add your titles and sound, then export your finished video from Final Cut.
Dragging previews or changing framing controls does not record camera movement or cuts. The XML uses your final framing for the whole recording. Preview position, mute, and gridlines do not change the export.
If playback is choppy in Final Cut
Large 360° files can be demanding during multicam playback. In Final Cut, select the source clip in the browser, choose File → Transcode Media…, and create ProRes Proxy media at 50% as a starting point. In the viewer’s View menu, choose Proxy Preferred for playback. If needed, try a smaller proxy size.
Before reporting slow Final Cut playback: confirm proxy generation is complete and Proxy Preferred is selected. Let any background rendering finish, then replay the same short section with other demanding work paused.
Before exporting the finished video, switch back to Optimized/Original. Choosing HD in AngleSelect changes the project dimensions; it does not create proxy media.
For more detail, see Apple’s guides to cutting and switching angles and creating optimized and proxy media.
Keep an HDR recording in HDR
For supported HDR footage, AngleSelect prepares the multicam, angle clips and project in the source’s Rec.2020 HLG or PQ color space. Import into a Wide Gamut HDR library: select the library, open its Inspector, and choose Modify beside Color Processing. The prepared clips keep Color Conform off so nested views retain their HDR picture values. Keep those settings unless you intentionally want to convert the picture. Check the project color space and finished picture before exporting.
Share using an HDR-capable format such as 10-bit ProRes with the project’s HLG or PQ color space. This is standard HDR output; AngleSelect does not author Dolby Vision metadata. Apple explains wide-gamut HDR library and project settings.
3. Save a Premiere Pro project
- On Mac, in the Premiere Pro export panel, leave Use video filename checked or uncheck it to name your project. Append details adds the angle count, format, and output size.
- On Windows, leave Use video filename checked to use the source name, or uncheck it to enter your own. Append details adds the angle count, format, and HD or 4K. Both choices and your custom name are remembered; names saved by older versions are preserved.
- Click Save & Open in Premiere… and save the
.prprojfile. This creates a native Premiere project with one shared original recording, fixed reframing for each view, and continuous source audio when present. It does not render individual angle videos.
For manual opening, use Save Project…, then open that project in Premiere. Keep the source recording and its drive available; relink it in Premiere if you move it. Saving another setup from AngleSelect creates a new project and does not keep cuts from a previous edit.
Choose your default editor in Settings; a remembered session reopens in the editor you last used. Existing Final Cut framing stays separate.
For GoPro 4K portrait, keep the prepared GoPro and Motion effects in their original order. Their paired rotations create the portrait frame; resetting Motion changes the framing.
4. Cut between your angles in Premiere
- Open the prepared sequence ending in — Edit.
- Enable Multi-Camera View in the Program Monitor. If its button is missing, use the monitor’s Button Editor (+) to add Toggle Multi-Camera View.
- Play the sequence and use the camera thumbnails or number keys 1–3 or 1–4 to cut between views. Keep the continuous audio track below the video.
- Refine the cuts, add titles and sound, and export your finished movie from Premiere.
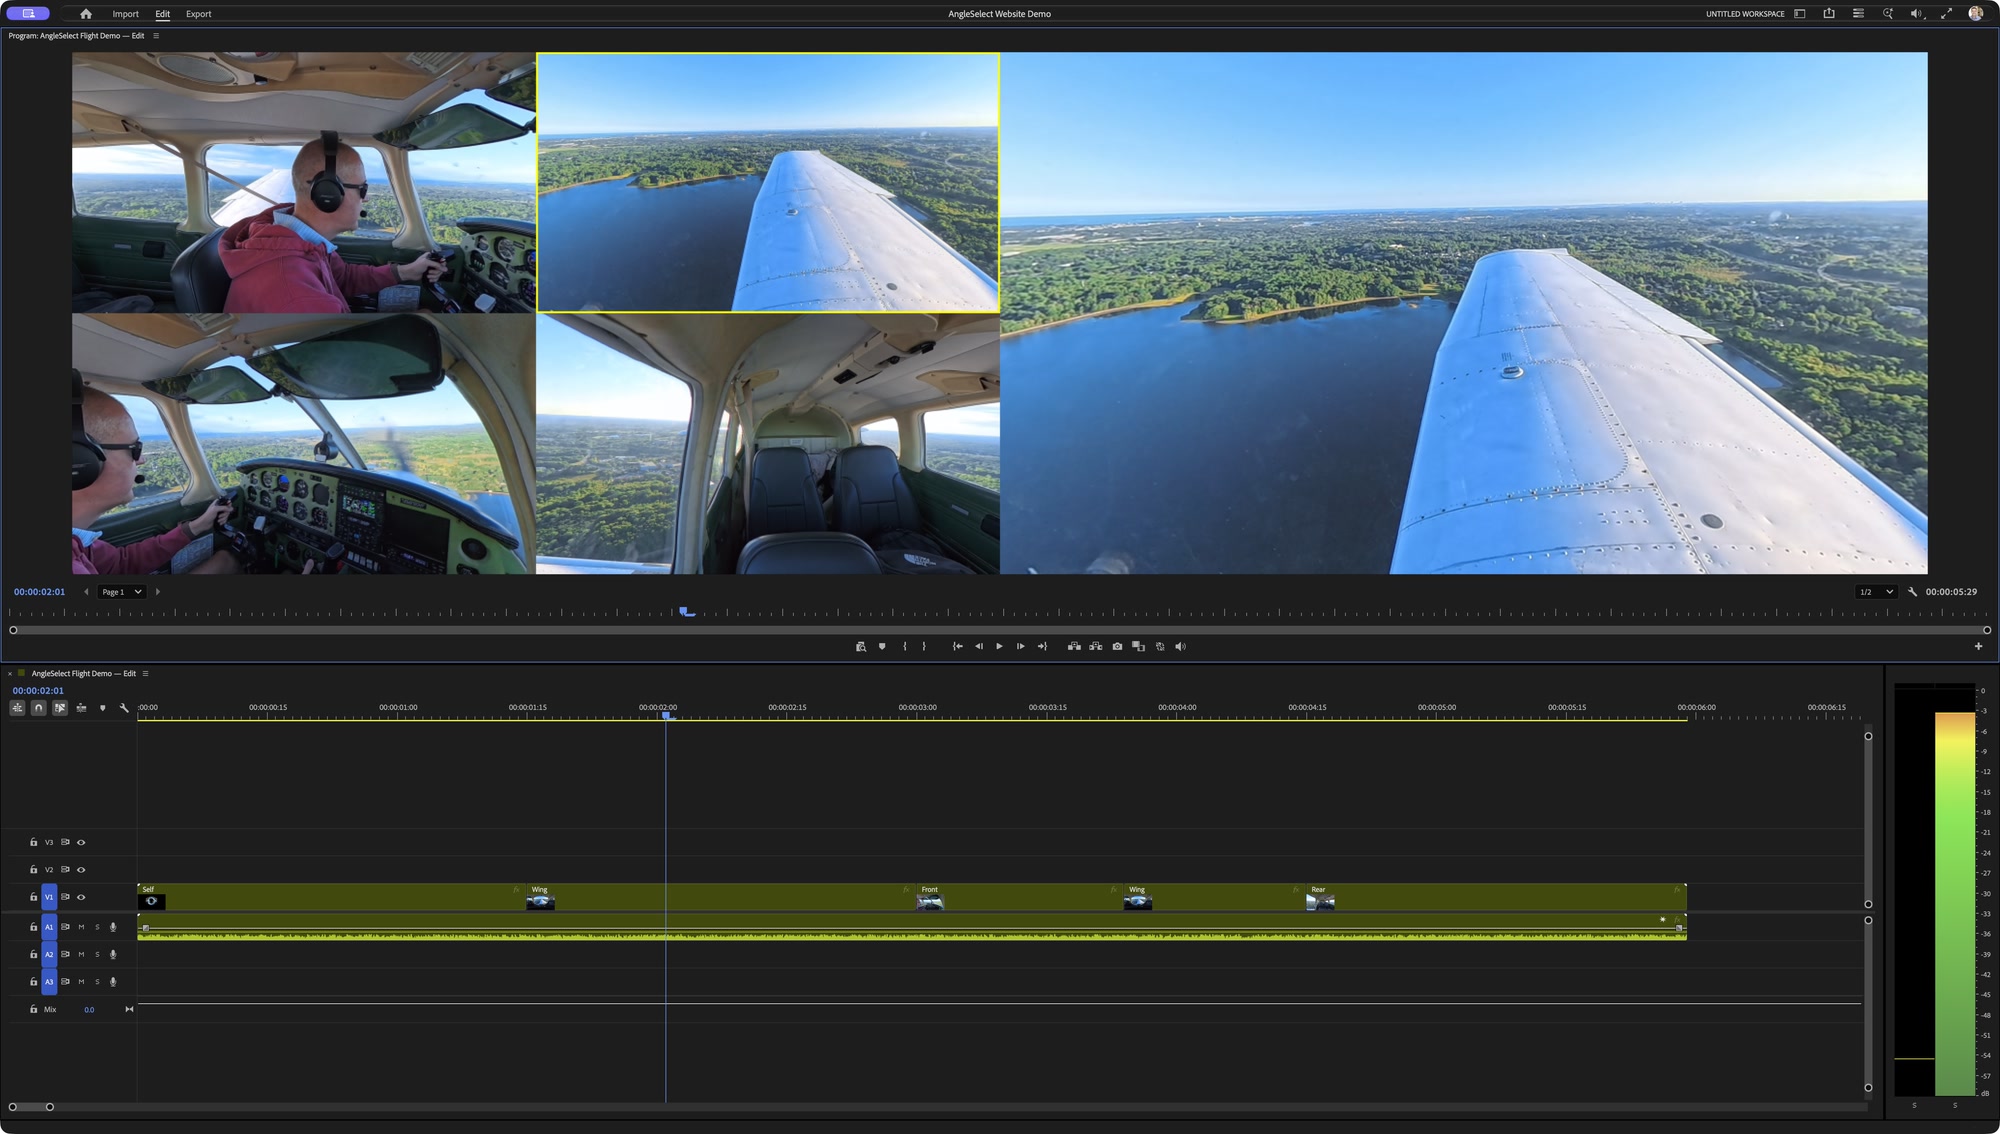
AngleSelect exports fixed framing for the whole recording. Dragging previews does not record camera moves or cuts. Your edits happen in Premiere.
See Adobe’s guide to editing a multi-camera sequence for the monitor controls and camera shortcuts.
Keep audio continuous: switch only the video camera, leaving the source audio beneath it intact. Check a short finished export before rendering a long edit. Our Premiere 26.5.2 tests found a small AAC audio delay that also appeared without AngleSelect; a native WAV control stayed aligned. If precise sync matters, compare a PCM/WAV export in your editor. See the measured coverage.
Make Premiere playback smoother
- Select the original recording in the Project panel. Right-click and choose Proxy → Create Proxies.
- Use Half frame size and a QuickTime ProRes Proxy preset as a starting point. Keep the full 360° panorama and its 2:1 shape. Let Adobe Media Encoder finish and confirm the proxy is attached in Premiere.
- Add Toggle Proxies using the Program Monitor’s Button Editor (+), then enable it for editing. Try Half playback resolution if needed. All views still refer to the shared original. Compare a paused frame with proxies on and off. If the framing changes, leave proxies off and use reduced playback resolution.
See Adobe’s proxy creation steps. Creating proxies takes time and disk space; it does not render four finished angle videos.
Before reporting slow Premiere playback: let Adobe Media Encoder finish, confirm the proxy is attached and Toggle Proxies is on, then try Half playback resolution. Pause other demanding work and compare the same short section.
Before exporting from Premiere
Turn off Toggle Proxies and confirm the full-resolution original is online. In Export settings, leave Use Proxies off. Keep the prepared sequence dimensions and frame rate. For SDR, export Rec.709. For supported HDR, keep the sequence and export in the matching Rec.2100 HLG or PQ color space; use a 10-bit format such as QuickTime → Apple ProRes 422, enable Render at Maximum Depth, and enable audio. An H.264/Rec.709 preset converts the result to SDR. Dolby Vision 8.4 sources produce standard HLG HDR without Dolby Vision metadata. Test a short export with picture and audio before rendering the full edit.
3. Save a Resolve Studio setup
On Mac
- In AngleSelect’s Resolve panel, name your setup and choose Save & Open in Resolve…. Choose a new folder.
- Keep playback stopped in Resolve. Choose Workspace → Scripts → AngleSelect Studio Import. Restart Resolve once if the newly installed helper is missing.
- The helper creates and saves a separate project with your prepared angles and an edit timeline. All views share one original video; no individual angle videos are rendered. Source audio stays continuous on its own track.
Keep the setup folder, original video, and its drive available. The Scripts menu uses the latest setup sent with Save & Open in Resolve… or Open in Resolve. Run the script before sending another setup. Sending a second setup changes the script’s target; it does not delete your first saved folder or any project already created in Resolve. Save Project… alone saves the folder without changing the script’s target.
On Windows
- In AngleSelect’s Resolve panel, name your setup and choose Save & Open in Resolve…. Save the
.angleselect-resolvefile. - Keep playback stopped in Resolve. Choose Workspace → Scripts → AngleSelect → Create Project. Review the project and source shown, then choose Create Project.
- The helper creates a separate project with your prepared angles and an edit timeline using built-in Fusion tools. All views share one original video, with continuous source audio on its own track.
Save Project… saves the setup without opening Resolve. To use it later, choose File → Open Saved Resolve Project… in AngleSelect, select the saved file, then run Create Project in Resolve. This prepares the saved setup for Resolve; it does not load its framing into AngleSelect or reopen edits made in Resolve. Keep the setup file, original video and its drive available.
Saving another setup creates a new project and does not carry over earlier cuts. If import stops, the error identifies the step and leaves the separate partial project available for inspection.
Make Resolve playback smoother
On Mac
- Open Project Settings → Master Settings. Set Proxy media resolution to Half and Proxy media format to ProRes 422 Proxy, then save.
- In the Media Pool, right-click the original video and choose Generate Proxy Media. Wait for it to finish. All angles share that proxy.
- The helper already selects Playback → Proxy Handling → Prefer Proxies and Playback → Timeline Playback Resolution → Half, with render cache off. Proxy media and timeline playback resolution are separate settings.
Leave Use Alpha enabled in Insta360 Reframe and the source-angle Scaling set to Fit, as prepared by the helper. These settings preserve your framing.
On Windows
The Windows importer does not create proxy media or change your playback preferences. If a compatible proxy is already linked to the original video, choose Playback → Proxy Handling → Prefer Proxies. The four angles share that source. Our Windows check covered switching between the original and an existing proxy; proxy-generation settings still need a separate Windows check.
Half timeline playback resolution is also available on Windows under Playback → Timeline Playback Resolution. It reduces processing during editing; it does not create a proxy. Performance depends on your computer, footage and other running work. Try a short section first, and let proxy generation finish before comparing playback.
Before reporting slow Resolve playback: confirm the proxy is linked, Prefer Proxies is selected and timeline playback resolution is Half. Pause other demanding work and replay a short section. Render cache is optional; if enabled, wait for it to finish rebuilding after framing changes. Proxies do not cache the reframe effect.
4. Cut between angles in Resolve
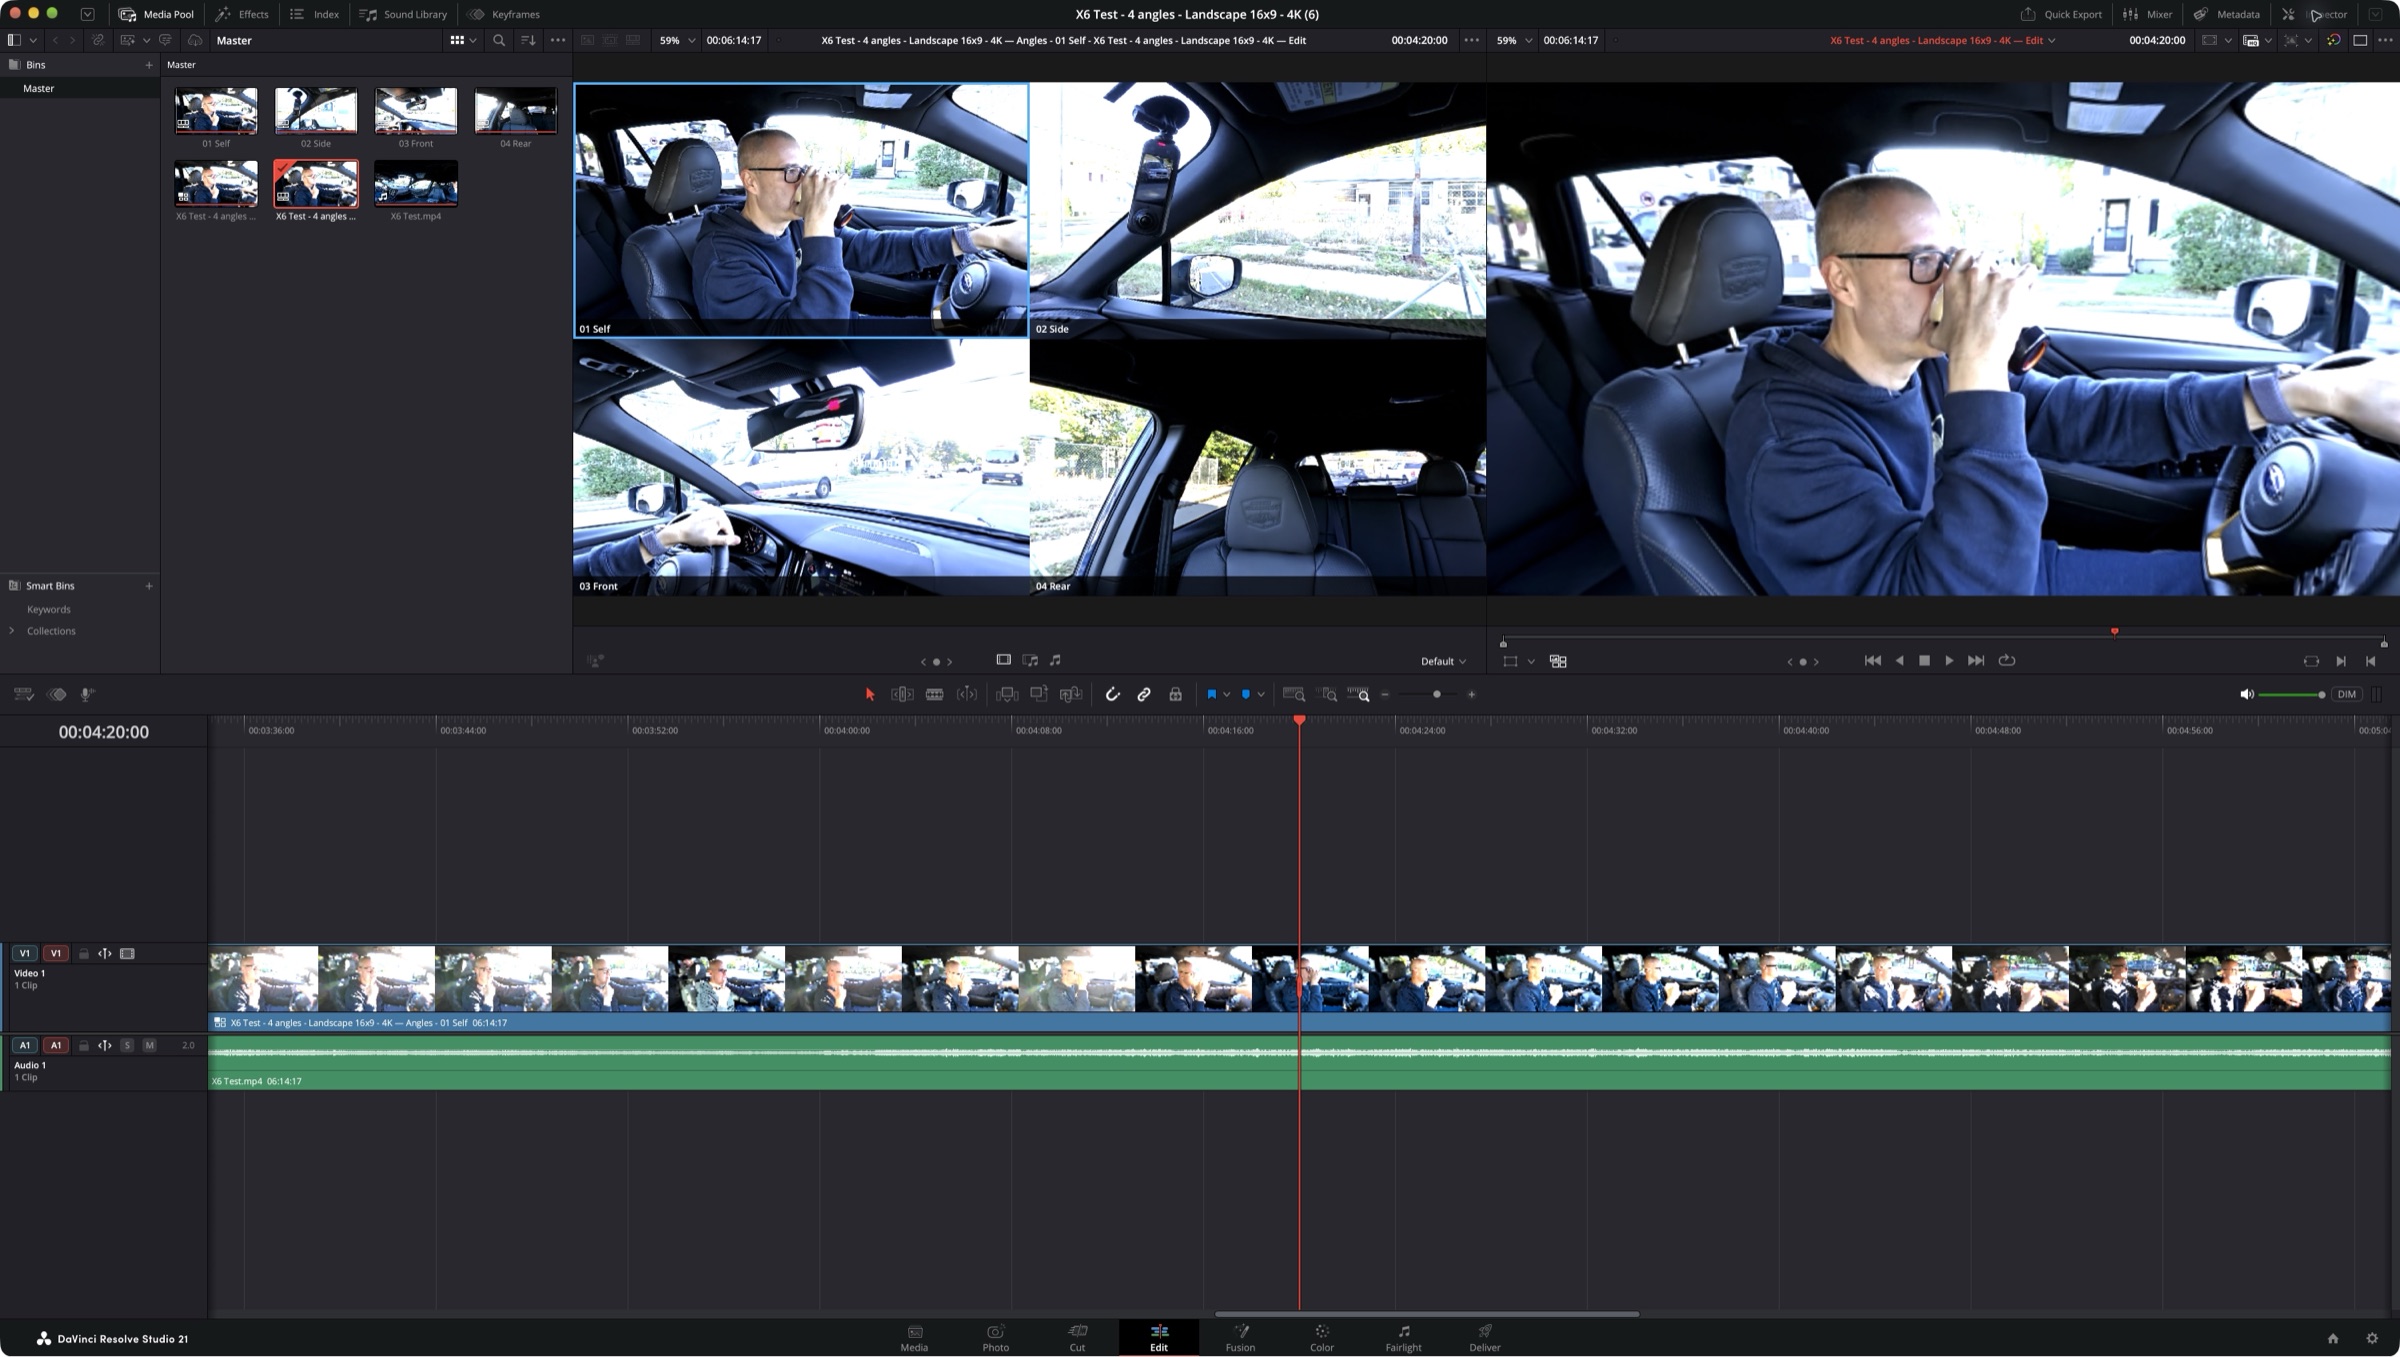
- Open the prepared edit timeline on Resolve’s Edit page.
- In Resolve Studio 21, choose Multicam using the control below the right viewer. The angle viewer appears on the left. Choose a 2×2 grid there.
- Choose Edit → Multicam → Video Only, then play and click an angle to cut to it. Keep the separate source-audio track continuous.
- Refine your cuts, add titles and sound, and save the project normally.
Before exporting the finished video
- Set Playback → Timeline Playback Resolution → Full.
- Set Playback → Proxy Handling → Prefer Camera Originals. Keep your original video and its drive connected.
- Save, close and reopen the project. This refreshes the effect after reduced-resolution editing and cleared reduced-size output in our Mac test.
- In Deliver, turn off Use proxy media, Use optimized media and Use render cached images. Queue a new render job.
For an HDR finish, use an HDR-capable export format and retain the project’s HLG or PQ color settings. Use a 10-bit format such as ProRes 422 on Mac, or DNxHR HQX or HEVC Main10 on Windows. Supported Dolby Vision 8.4 footage stays HDR through its HLG picture; Dolby Vision metadata is not included. Check a short finished export before rendering a long recording.
Proxies, render cache and disk space
- Original: your full-quality stitched recording. Keep it connected for the final export.
- Proxy: a smaller, easier-to-play copy of the whole panorama. Your angles share it. Generating it does not change the original, and a proxy is not a finished angle video.
- Playback resolution: asks the editor to do less work while you edit. It is separate from proxy generation.
- Render cache: temporary pictures after effects and framing. Changing an angle can make that cache out of date, so let it rebuild or remove the affected generated cache before comparing results.
Choose a drive with free space before generating media. Long 360° recordings and ProRes copies can use many gigabytes. Keep proxy/cache folders separate from originals, and try a short clip first.
In Resolve, check Project Settings → Master Settings → Working Folders for proxy and cache locations. The Mac helper starts with render cache off; this keeps the initial comparison simple. If you enable cache later, wait for the timeline cache indicators to finish before judging playback. Use Resolve’s Playback → Delete Render Cache menu to remove generated cache. Before deleting a proxy file, unlink it from the source in the Media Pool and confirm the camera original is online.
Premiere’s Create Proxies dialog lets you place proxies beside the original in a Proxy folder or choose another folder. Wait until Media Encoder has finished and Premiere shows the attached proxy. Before removing proxy files, use Proxy → Detach Proxies on the source and confirm the full-resolution recording is online. Preview/render files can be rebuilt after an effect or framing change.
Final Cut’s library storage settings choose where generated media is kept. Wait for Background Tasks to finish transcoding or rendering. Use File → Delete Generated Library Files to remove generated proxy, optimized or render media when needed; select only the generated files you intend to remove.
Delete only generated media you can recreate. Keep original recordings, AngleSelect setup files, editor projects and backups. Return to the original-media settings in your editor’s export steps above before rendering the final movie.
Export separate flat videos
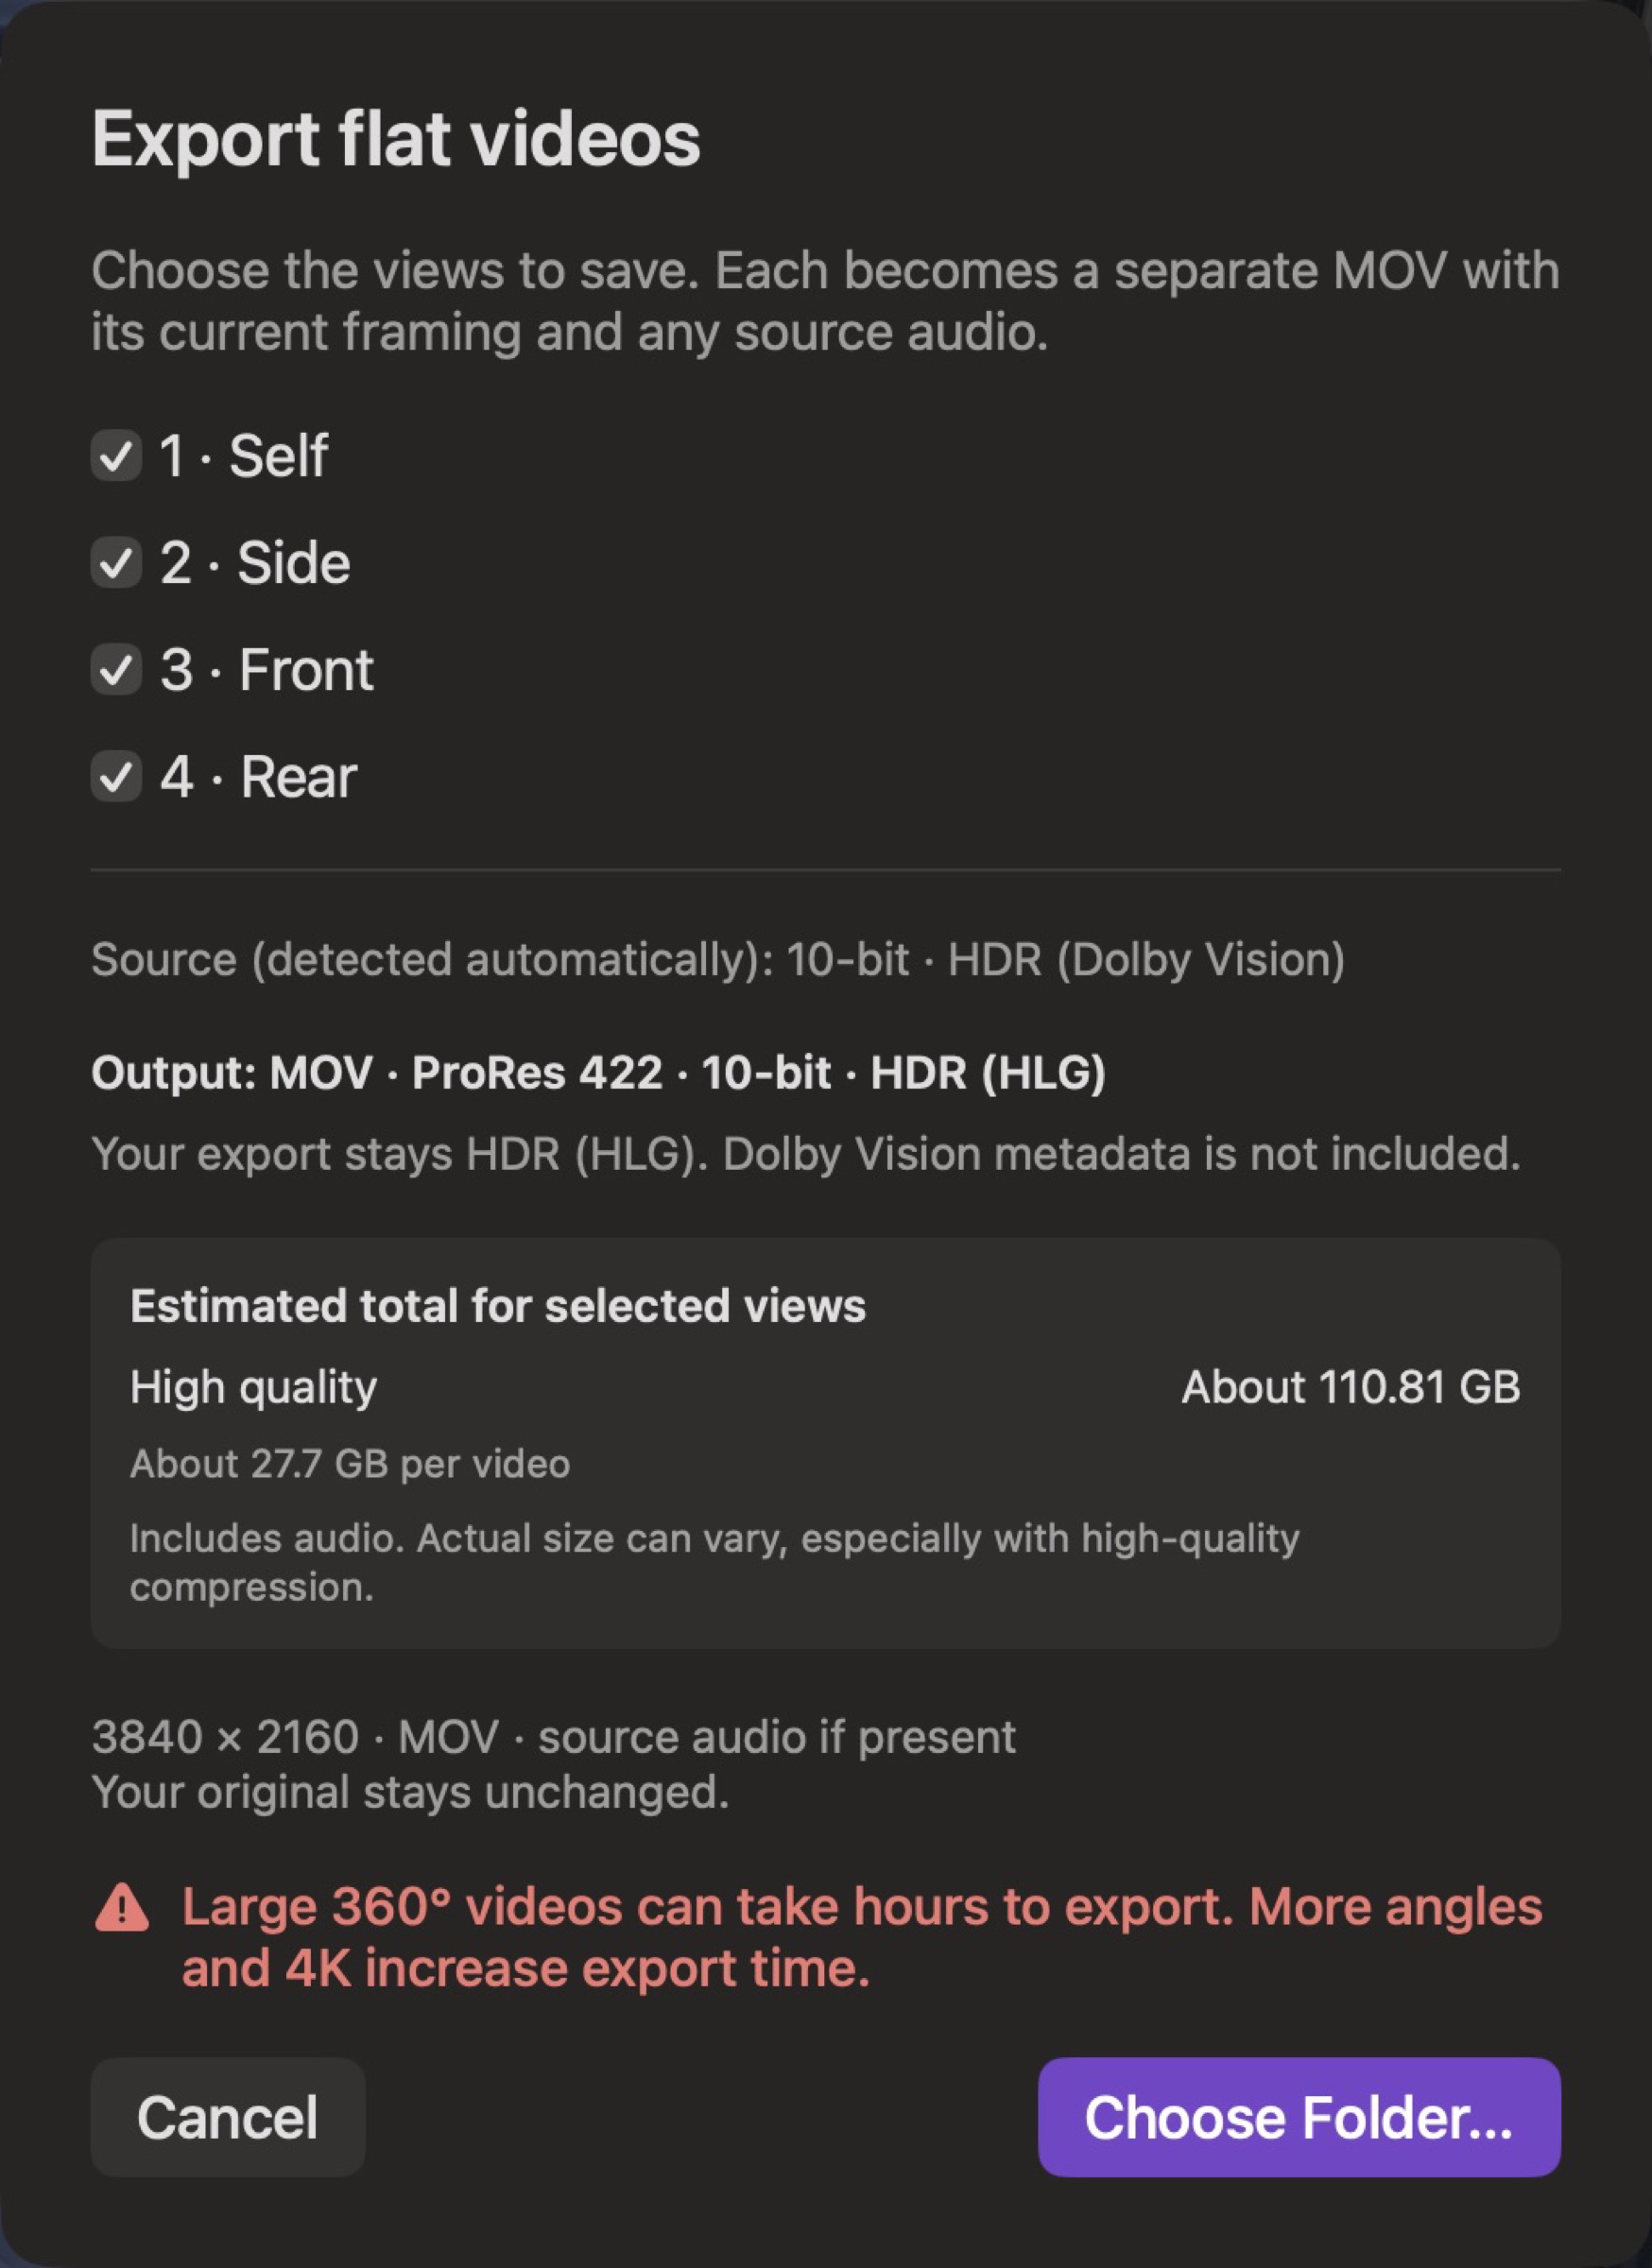
On Mac or Windows, click Export Videos… in the Individual videos panel. Select your views and choose a folder. Each view becomes a full-length, high-quality MOV with its current framing and source audio. The current playhead position does not trim the export.
Bit depth and HDR are detected automatically. The chooser shows the detected source, output codec and estimated size. There are no bit-depth or HDR settings to configure. Video is re-encoded after reframing. Source audio stays attached without another lossy audio encode.
Which video format is used?
MOV is the file type; H.264 and ProRes 422 are video codecs inside it. AngleSelect chooses the codec automatically from your source:
| Source | Output | When it is useful |
|---|---|---|
| 8-bit SDR | H.264 · 8-bit SDR | Everyday SDR videos, with smaller files than ProRes. |
| Above 8-bit SDR or supported HLG/PQ HDR | ProRes 422 · 10-bit | Further editing and color work, including standard HDR. Files are larger than H.264. |
ProRes exports are 10-bit on both Mac and Windows. Sources above 10-bit are reduced to 10-bit when exported. AngleSelect keeps the original source unchanged. See Apple’s ProRes overview for more about ProRes 422.
HEVC/H.265 can be used in a supported stitched source, but AngleSelect does not offer HEVC or MP4 flat-video output. If you need those delivery formats, export them from your video editor after editing.
ProRes Proxy / ProRes 422 Proxy is a smaller editing copy created in your editor to improve playback. It is separate from AngleSelect’s full-quality MOV exports. Follow your editor’s guide above to return to original media before the final export.
Saving an editor project is different from Export Videos. A Final Cut, Premiere or Resolve setup references your original stitched video and keeps the views available for editing. Export Videos renders each view into a separate flat MOV with its framing baked in; no editor or reframe plugin is needed.
The chooser shows an estimated size per video and for all selected views. Actual compressed sizes vary with the footage. As a guide, one 4K30 view is about 373 MB per minute with H.264 or 4.4 GB per minute with ProRes 422, before audio and overhead. ProRes is an editing format and uses more space. Allow extra temporary disk space.
Landscape outputs are 1920 × 1080 in HD or 3840 × 2160 in 4K. Portrait outputs are 1080 × 1920 in HD or 2160 × 3840 in 4K. Editor projects and flat videos use these same dimensions; saving individual MOVs does not require a plugin.
Large 360° videos can take hours to export. More views and 4K take longer and use more disk space. Try a short clip first. Cancelling removes unfinished output; existing files are not replaced. Completed Windows MOVs remain saved when a later view is cancelled.
See the shared format FAQ for supported sources. HDR10 color and mastering metadata are retained when present. Supported Dolby Vision 8.4 footage exports as standard 10-bit HLG HDR on Mac and Windows. Your export stays HDR; Dolby Vision metadata is not included.
Closing the main window quits AngleSelect. During an export, choose Keep Exporting or Stop Export and Quit. Stopping waits for unfinished-file cleanup; an export or cleanup error leaves the app open. Closing the Windows export progress window cancels the export without quitting the workspace.
Flat-video exports run at a lower scheduling priority to leave more room for foreground work. Windows also limits decoding, filtering, and encoding workers and exports one view at a time. Exports still use CPU, graphics, and disk resources, so demanding work can slow down while an export runs.
What to expect in this version
- Saving from AngleSelect creates a new prepared setup. It does not add an edit to an existing timeline automatically.
- AngleSelect remembers one last session. It cannot reopen edits made in your video editor. On Windows, a saved
.angleselect-resolvesetup can prepare a new Resolve project again; it is not an editable AngleSelect workspace document. - Re-exporting from AngleSelect creates a new setup and does not preserve cuts you have already made in your editor. For another aspect ratio of an edited project, use Final Cut’s Duplicate Project As command and review the framing.
- The Mac app offers Final Cut XML, native Premiere projects, Resolve Studio setups, and separate MOV exports. Each editor has its own requirements; select it above for the matching steps.
- The native Windows app saves Premiere projects, Resolve Studio setups, and separate MOV videos. Final Cut XML is available on Mac only.
For camera-by-camera coverage and pending timing, timecode, and installation checks, see what’s untested.
Keep AngleSelect up to date
If the last video cannot be reopened, reconnect its drive and keep the remembered setup with OK, or choose Clear Last Opened State. That choice forgets the missing video and playback position, while keeping your angle names, framing and output choices. It does not delete any footage.
For a playback issue, first try the AngleSelect preview checks and the playback steps for your selected editor. If it is still slow, tell us which steps you tried and whether the issue appears in AngleSelect or your editor.
For a bug report, choose Help → Save Debug Report… to save a small text file with app, video-format, output, and playback/export details. Review it, then use the optional saved-report field on the contact page. The app-generated report omits footage, video names, local paths, and installation identifiers; it is sent only when you choose it and submit the form.
Read the usage terms and privacy notice before using the app. Installation, app-open, and editor-session counts are required. The checkbox starts unchecked; select it and choose Agree and continue, or choose Quit. Everyone is asked, including people updating with an earlier sharing choice. Agreement is saved locally for that terms revision and survives updates; a new required revision asks again.
Windows
Choose Help → Check for Updates… to check manually. Automatic checks start enabled and run about once a week while the app is in use; change them in Settings → Updates.
When an update is available, choose to download it. AngleSelect verifies the download before asking whether to close and start the installer. Preferences, the installation code, and any accepted terms revision are preserved; a different required revision asks for agreement again.
For a bug report or feature idea, use Help → Contact Sam… or visit the contact page.
Mac
Choose AngleSelect → Check for Updates… to check manually. Automatic checks are enabled by default and run about once a week; change them in the update window or AngleSelect → Settings…. You choose when to install and restart. The update window explains whether your current session will be restored. Older versions may show an extra confirmation while upgrading. Preferences and any accepted terms revision are preserved when you update; a different required revision asks for agreement again.
Save XML whenever you want to use the setup in Final Cut; AngleSelect cannot reopen that XML.
For a bug report or feature idea, use Report a Bug… or Request a Feature… in the gear menu, or visit the contact page.
For a fresh start, choose Reset All Settings and Quit… in the AngleSelect menuthe Help menu or Privacy settings. Confirm to clear the saved agreement, installation code, session, preferences, and app caches. Reset leaves the app installed. Your footage and exported files stay intact; next launch shows the unchecked agreement. Normal app updates preserve your settings.
To remove the Mac app too, choose AngleSelect → Uninstall AngleSelect… or open Settings → Privacy and click Uninstall AngleSelect…. Confirm to clear AngleSelect’s local settings and app-owned caches, move the current app to Trash, and quit. Your footage, saved projects, exported videos, editors, and plugins are preserved. Wait for an export or update to finish first; uninstall is unavailable from a read-only disk image.
Normal Windows uninstall preserves your saved settings and agreement. To remove those too, use Reset All Settings and Quit… before uninstalling. The Mac uninstall command does not change Windows behavior.